
Overview
Each Objective you've created can have its own Feedback Node in the Feedback tab. A Feedback Node is a container tied to one Objective (or set to "Always" display, for feedback that isn't score-based). Within a node, you define one or more Ranges — score bands that determine which feedback the student sees based on how they performed.
Creating and Managing a Feedback Node
A default Feedback Node is automatically created for each Objective, and one is created for the Combined/Roll-Up Score too. You can add more using the "+New Feedback Node" button at the top of the page, or the small "+" that appears above, below, or between existing nodes. When you do, a dropdown lets you choose which Objective the node should reference (or set it to always display).
Each node can be expanded or collapsed (the play-style icon), pinned open so it stays visible while you work on other nodes (the pin icon), reordered with the up/down arrows, duplicated, or deleted (trash icon, only available once the node is expanded). The "Go To Objective" button is a shortcut that jumps you to that objective's definition, for convenience.
Adding and Adjusting Ranges
Click "+Range" above or below an existing range to add a new one. Each range has two number fields (the score boundaries) and an operator control between them — this sets whether each boundary is inclusive (≤) or exclusive (<). For example, "0 ≤ X < 65" catches scores from 0 up to just under 65, while the next range starts at "65 ≤ X ≤ 85". Getting these boundaries right matters: if two ranges overlap, both could trigger and show conflicting feedback; if there's a gap between them, no feedback will show for scores that fall in it. It's worth double-checking your ranges with the Preview Feedback button after making changes.
Each range also has a Range Color swatch — this sets a background color for the whole range block, and you can click the "+" after the preset swatches to choose a custom color.
Adding and Sizing Feedback Elements
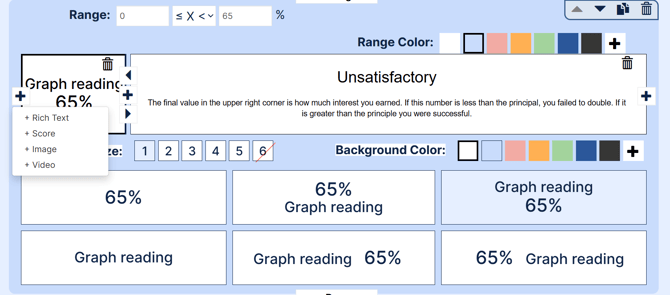
Within a range, click a "+" (either inside the range or to the left/right of existing elements) to add a Feedback Element — a rich text box, an image, a video, or the student's score for that objective. You added examples of each in your demo range, which is a great reference.
Each range is divided into six size units. When you select a Score element, a "Score Block Size" control (1–6) appears, letting you decide how much horizontal space it takes up; if the range is already partly filled by other elements (like your image), the larger sizes gray out automatically because there isn't room left. Rich text elements expand automatically to fill whatever space remains, and all elements in a range stretch to match the height of the tallest one.
For the Score element specifically, there's also a display-style picker showing several ways to pair the objective name with its score percentage (score only, name only, name above score, score above name, or side-by-side in either order) — click whichever layout you want. Score elements also have their own Background Color swatch, separate from the Range Color.
To reorder elements within a range, use the left/right arrow buttons that appear between them, which swap positions. The trash icon on each element deletes just that element.